How to Send Google Forms Responses to Google Sheets and Telegram with Make Free

This article may contain affiliate links. If you purchase through them, we may earn a commission at no additional cost to you. Full disclosure
Result: a form that collects inquiries, a Google Sheets table where every inquiry sits in its own row marked “New” or “Repeat”, and a Telegram message for each inquiry, sent within about a second of submission (Method B) or on a schedule (Method A).
Tools: Google Forms, Google Sheets, Make Free (Make’s free plan) and Telegram.
Prerequisites: a Google account, a Telegram account and about an hour.
At the end of this article you can download the ready-made scenario for sending Google Forms responses to Telegram and import it into Make.
Form responses usually pile up in a spreadsheet that someone opens once a day. Here we build a workflow that sends Google Forms responses to Telegram and Google Sheets: each inquiry is added to a sheet automatically, and the team gets a Telegram notification that shows whether the person is writing for the first time or has been in touch before. The notification arrives within about a second with Method B, or on the next scheduled run with Method A.
Every tool here is free, which makes this a good first automation: you can build it and run it on real inquiries without paying anything. There are two ways to trigger it: on a schedule with no code at all (Method A), or instantly with a small script inside the form (Method B). We tested both on Make Free and show what each costs in credits, because that is where the free plan is tightest.
What you will get
After the steps below you will have:
- a form with four fields: Name, Email, Phone, Comment;
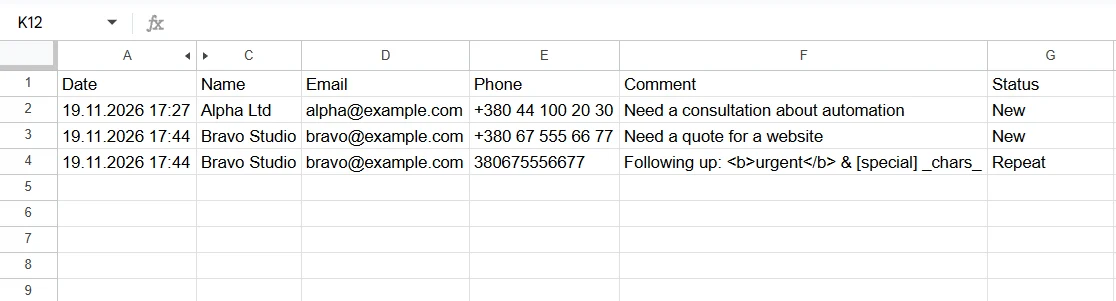
- a Leads sheet with the columns Date, Response ID, Name, Email, Phone, Comment and Status. Each inquiry gets its own row. The Date column records the form submission time, and phone numbers are stored as text to preserve the leading plus sign;
- a Status of “New” for the first inquiry from an email address and “Repeat” for later ones. Each repeat is added as a new row, so the history is never overwritten;
- a Telegram message for every inquiry with the name, email, phone, comment and the New or Repeat label;
- a Make scenario that sends Google Forms responses to Telegram on a schedule (Method A) or instantly (Method B).
We ran every step on a new Make Free account on 19 November 2026, so interface names below match that date.
Who this tutorial is for
This is for a small team that wants Google Forms responses to Telegram, so inquiries show up in a chat instead of sitting in a spreadsheet. It also suits anyone who wants to learn what automation is on a real task without spending money. No experience is needed: we explain each term the first time it appears. By the end you will know Make’s core ideas (trigger, module, filter, router, credit) well enough to build your next automation on your own.
Know the limits of the free setup up front. Make Free gives 1,000 credits a month. With Method A, a working-hours schedule alone takes about 792 credits and each inquiry adds 3 more, which leaves room for roughly 69 inquiries a month. Method B has no idle checks and an inquiry costs 4 credits, so the ceiling is about 250 inquiries a month if no other scenarios run in the account. We calculated both figures from the measured cost of runs. Beyond that, the free plan is not enough.
Messages go to a shared chat, so everyone in the group sees every inquiry. That works well for a small team, but you cannot assign an owner or track deal stages here. For that you need a CRM: see a mini-CRM in Google Sheets and getting started with HubSpot, and start your choice with the CRM selection guide. This scenario is deliberately simpler.
What you will need
- A Google account. You will create the form and the sheet in it and give Make access to both.
- A Telegram account. We create a bot that sends the messages and add it to a chat or group. The messages will contain customers’ names, emails and phone numbers, so keep the group small.
- A Make Free account. According to Make’s official pricing page (checked 19 November 2026), Make Free gives 1,000 credits a month, 2 active scenarios and a minimum run interval of 15 minutes, which matches what our account showed. A credit is Make’s unit of usage; in our tests each module action cost one credit. You can sign up on the Make site (an affiliate link); the free plan is enough for the whole scenario.
- An hour. The breakdown is below.
How long it takes
Rough estimates; we did not time the steps precisely:
| Phase | What we do | Approx. time |
|---|---|---|
| A. Preparation | Form, sheet, Telegram bot | 15 minutes |
| B. Scenario | Modules, repeat lookup, sheet row, Telegram | 25 minutes |
| C. Launch | Schedule (Method A) or form script (Method B) | 10 minutes for A, 15 for B |
| D. Testing | A new and a repeat inquiry | 10 minutes |
If you import the ready-made scenario, Phase B is mostly a matter of connecting your accounts and selecting your form and sheet.
Which launch method to choose
A Make scenario is made of modules, each doing one thing (read a response, find a row, write a row, send a message). The first module, the trigger, decides when the scenario starts, so pick the method first. Both methods deliver Google Forms responses to Telegram in the same way; they differ only in the trigger.
| Method A: on a schedule | Method B: instant | |
|---|---|---|
| Trigger | Google Forms, Watch Responses module | Custom webhook and a script in the form |
| Code | None | A script of about 40 lines you copy |
| Delay | Up to the schedule interval | About a second in our test |
| Credits per inquiry | 3 (search, write, Telegram); the read credit is already part of the check | 4 (webhook, search, write, Telegram) |
| Credits when there are no inquiries | 1 per check | 0 |
The last row matters more than it looks. Watch Responses costs a credit on every scheduled run even when there are no new responses. Run it every 15 minutes around the clock and that is 96 checks a day, roughly 2,880 credits a month, almost three times the free limit before a single inquiry arrives. So for Method A you have to narrow the schedule: in our test the free plan let us save a 15-minute interval on weekdays between 09:00 and 18:00, which is 36 checks a day and about 792 credits in a month with 22 working days. That leaves around 208 credits.
The Watch Responses credit is already counted in the check, so each inquiry adds only 3 credits, enough for about 69 inquiries. In our test a run that handled 8 responses at once cost 25 credits: 1 for the trigger and 3 for each response. An hourly schedule costs 720 credits; every two hours, 360.
Method B spends no credits on empty checks, but it needs a script and has its own queue limits (see the mistakes section). If inquiries are rare and a few minutes of delay is fine, start with Method A. If speed matters or volume is higher, choose B.
Step-by-step: Google Forms responses to Telegram and Sheets
Step-by-step guide: send Google Forms responses to Google Sheets and Telegram with Make Free, with New and Repeat labels, on a schedule or instantly.
Total Time: 1 hour
Step 1. Create the form
Phase A. Preparation
In Google Forms, create a form with four questions: Name, Email, Phone and Comment, and set all four to Short answer. Make Email required. We look for repeat inquiries by email, and in our test an empty email was never counted as a repeat (details in the mistakes section).
Check: you can open the form by its link and submit a test response.
Step 2. Prepare the spreadsheet
Create a Google Sheets file and link the form to it: in Google Forms open the Responses tab and click “Link to Sheets”. Google creates a sheet where it collects the responses. Add a second sheet called Leads with headers in the first row: Date, Response ID, Name, Email, Phone, Comment, Status.
Keep the form responses sheet and Leads separate: the first stores the original form submissions, while Leads holds the processed records the scenario writes and searches.
Check: the file has two sheets, and Leads contains only the header row.
Step 3. Create a Telegram bot
In Telegram open @BotFather, send /newbot and name your bot. BotFather replies with a token, which is the bot’s password. Do not publish it, paste it into chats or show it in screenshots; it goes only into Make’s connection.
Create a chat or group and add the bot. Then send the bot a command: in a private chat, send /start; in a group, send /start@your_bot_name. In a group the bot may not see an ordinary message, because by default it runs in Privacy Mode and receives only commands addressed to it. To find the Chat ID (the numeric identifier of the chat the bot will write to), you can use the getUpdates method from the Telegram Bot API documentation, which shows the ID of the chat the bot received the message from. Do not bookmark or share the link that contains your token.
Check: you have a bot token and a Chat ID, and the bot is in the chat.
We show Method A first. For Method B the first module is different (step 9B); the rest is the same. If you would rather not build it by hand, import the ready-made file for your method: the modules and filters come in place, and you only connect your Google and Telegram accounts and replace YOUR_SPREADSHEET_ID, YOUR_TELEGRAM_CHAT_ID and (for Method A) YOUR_GOOGLE_FORM_ID with your own values.
In the Method A file the form fields are bound to the question IDs of our test form, so after you pick your own form, select the Name, Email, Phone and Comment variables again in Search Rows, both Add a Row modules and both Telegram modules (Method B needs no remapping if your questions use the same titles). The schedule is not stored in the file: set it as in step 9A, and for Method B make sure to choose “Immediately”, because, in our test, the imported scenario defaulted to “Every 15 minutes”.
Step 4. Create the scenario and add the trigger
Phase B. The scenario in Make
In Make: Scenarios, then Create scenario. Add Google Forms, Watch Responses as the first module. Make asks you to connect your Google account and choose your form. The Limit field defaults to 2; we raised it to 10 so that several inquiries arriving between two checks are not left for later. “Choose where to start” decides which response the scenario begins with.
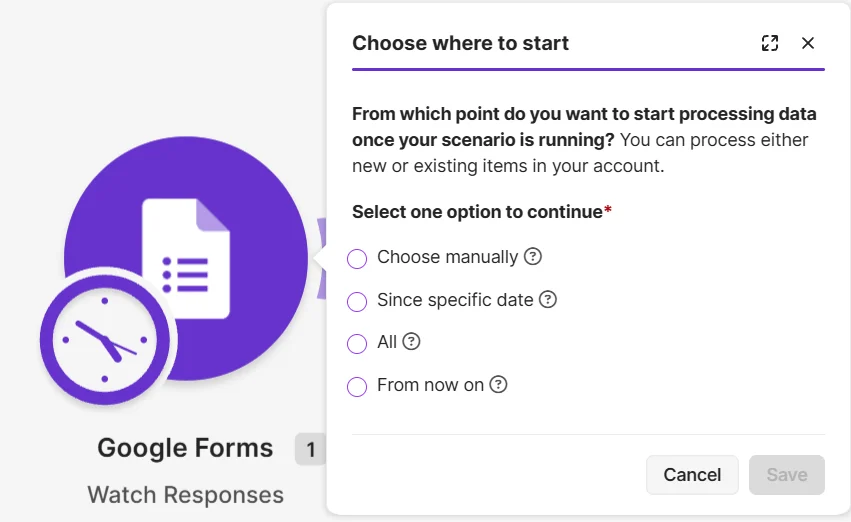
Make remembers which responses it has already handled. So be careful with “Run this module only” on Watch Responses: in our test a run made just to see sample data consumed the new response, and the next full run found nothing. To refresh the sample data, submit another response.
Check: the module opens without errors and shows your form fields.
Step 5. Add a lookup for repeat inquiries
Add Google Sheets, Search Rows and choose the Leads sheet. In the filter, set the column Email, the condition Equal to, and the value to the email from the form response. Set the Limit field at the bottom of the module to 1.
This is the whole idea behind repeat detection: if the module finds nothing, the inquiry is new; if it finds something, it is a repeat. A search with no results does not stop the scenario, it passes an empty result bundle to the next module, and that is what lets the scenario branch at the next step.
The limit of one row matters. Without it the module returns each matching row separately, and Make runs the repeat branch once for every row it found. In our test a third inquiry from the same address created two identical Repeat rows, sent two messages and cost 6 credits instead of 4. With Limit set to 1, a fourth inquiry produced a single row.
Check: Search Rows points at Leads and Limit is 1.
Step 6. Split the scenario with a router
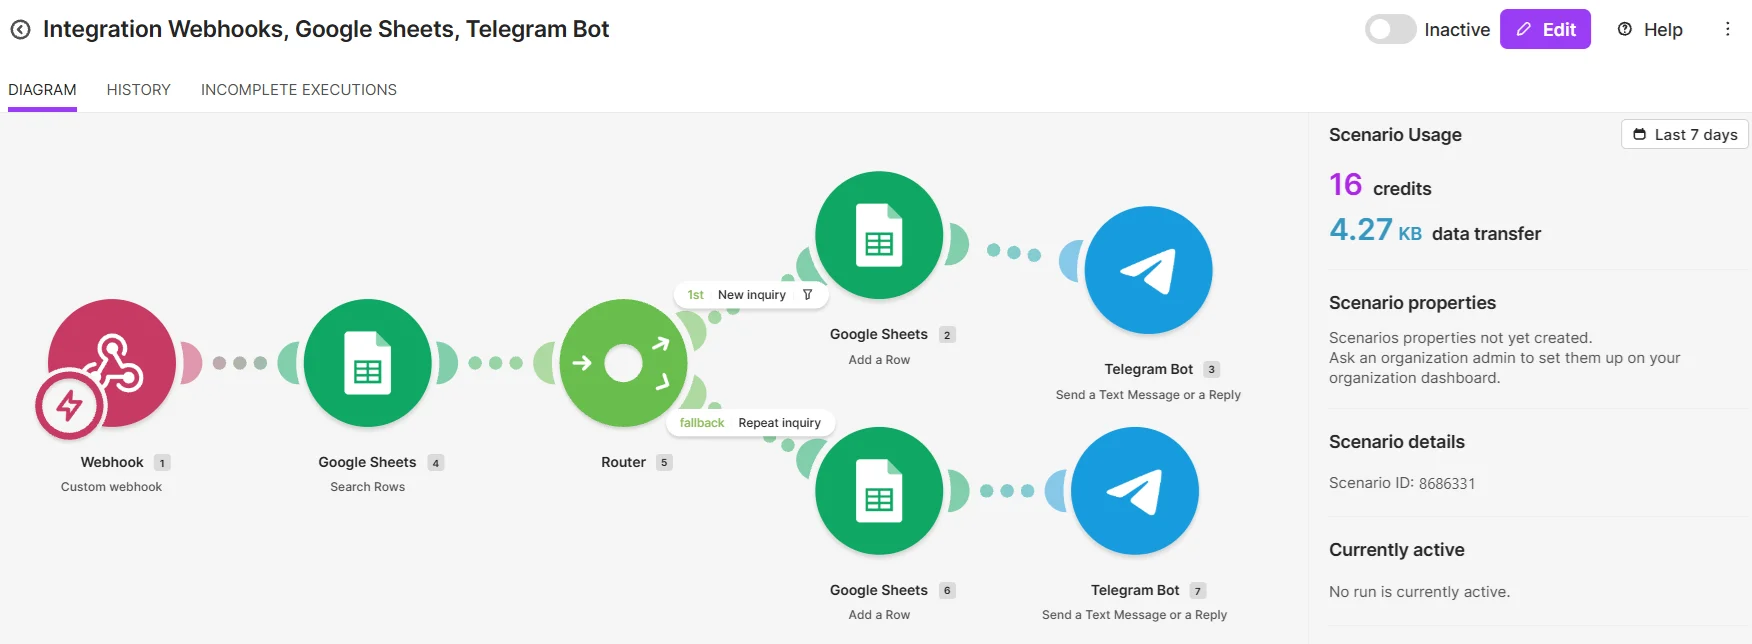
Add a Router (a tool that splits the scenario into several branches). Set up two branches:
- The first branch, “New inquiry”, with the filter: Total number of bundles (the number of rows found) Equal to 0.
- The second branch, “Repeat inquiry”, with no filter; in the branch settings mark it as a fallback, meaning it runs when the first one did not pass.
At first we left the second branch with no condition and no fallback flag, expecting “else” logic. Make ran both branches for the same inquiry and the sheet got two rows per inquiry. The fallback flag removes that problem.
Check: the router has two branches, the first with a filter and the second marked as fallback.
Step 7. Add a sheet row in both branches
On each branch add Google Sheets, Add a Row. Choose the Leads sheet and map the columns:
- Date: the formatDate function with the Last Submitted Time variable from the Google Forms module and the format DD.MM.YYYY HH:mm;
- Response ID, Name, Email, Phone, Comment: the matching fields from the form response;
- Status: “New” on the first branch and “Repeat” on the second.
Three things we tripped over:
- Insert the date through the mapping panel: the formatDate function (“Date and time” tab) and the Last Submitted Time variable. The sheet then shows when the customer submitted the form, not when Make processed it; with Method A the gap can be as long as the schedule interval. Select functions and variables from the mapping panel: in our test a now variable typed by hand stayed plain text and Make stopped with the error “‘now’ is not a valid date”. Enter the format without quotation marks, or the quotes end up in the cell.
- The phone number. In the module’s advanced settings (“Show advanced settings”) the Value input option defaults to “User entered”, so Google Sheets reads the leading plus as the start of a formula and shows #ERROR!. Choose “Raw” and “+380 50 222 33 44” stays text.
- Each form question appears twice in the variable list. Choose the lower entry in the variable list: textAnswers, answers, value; the one with the long Grade, Feedback, Text Answers path does not work. Searching the panel by question name helps.
Check: both branches have an Add a Row with the same mappings, differing only in Status.
Step 8. Send Google Forms responses to Telegram
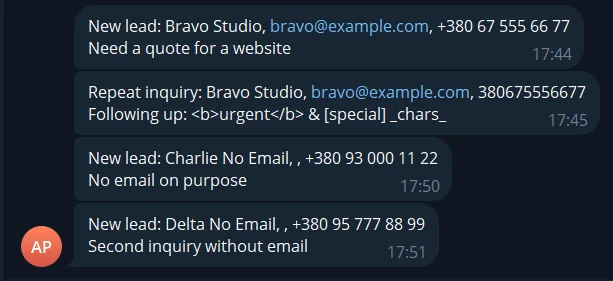
After Add a Row on each branch, add Telegram Bot, Send a Text Message or a Reply. Create the connection: Make asks for the bot token, so paste it yourself (nobody else needs to see it). Enter your Chat ID. In the Text field, build your message using the form response fields, for example “New inquiry: Name, Email, Phone. Comment: Comment” (and “Repeat inquiry” on the second branch).
Leave Parse mode empty. We tested a comment with markup characters, <b>urgent</b> & [special] _chars_: in plain text mode Telegram showed it literally, exactly as the customer typed it, with no error. With HTML mode on, a customer comment containing < or & can break sending, so this scenario does not need it.
If an inquiry has an empty email, the message reads “Name, , Phone” with a double comma, one more reason to make Email required.
Check: both branches end with a Telegram module and the Chat ID is filled in.
Step 9A. Set the schedule (Method A)
Phase C. Launch
Click the clock icon next to the first module. In the schedule settings choose Advanced scheduling and set weekdays, 09:00 to 18:00, every 15 minutes. The time zone comes from your organization settings; in our case sheet dates matched local time (Europe/Kyiv).
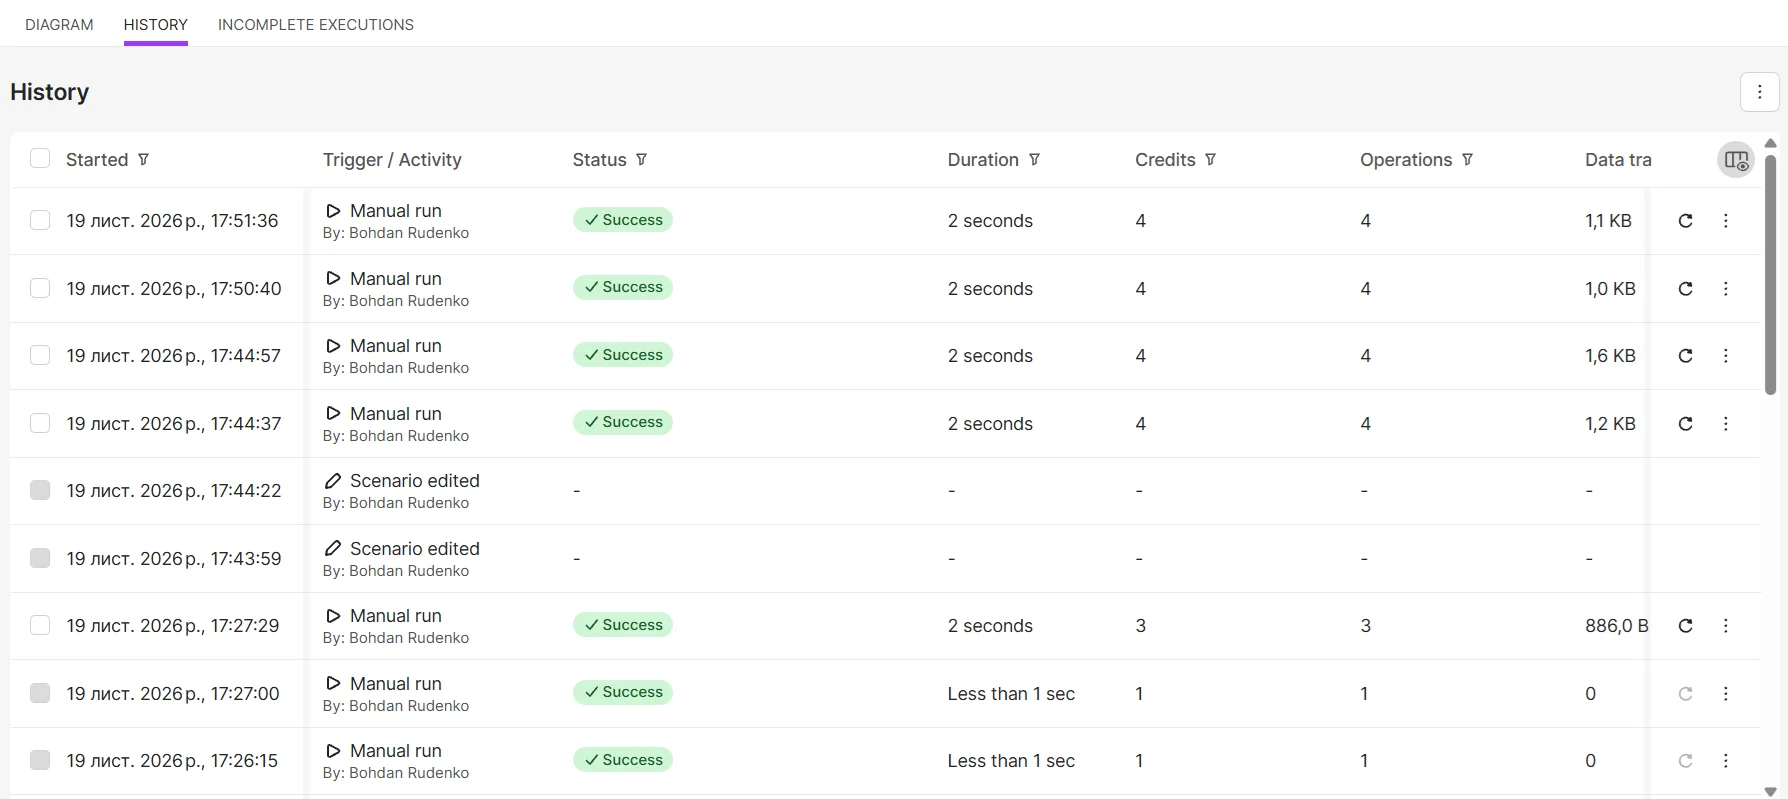
Two things we verified. First, when you activate the scenario it runs immediately instead of waiting for the next interval boundary: our first run started three seconds after we switched it on. Second, there were no runs outside working hours: History showed nothing after 18:00 (we observed a single slot, so we draw no general conclusion). Now switch on the Active toggle in the top right of the editor.
When you finish testing, switch the scenario off: Make Free allows only two active scenarios, and a schedule keeps spending credits while the scenario is on.
Check: History shows a run with the Schedule trigger; the first run either handled a response already in the form or, if there was none, cost 1 credit.
Step 9B. Connect the form with a webhook and a script (Method B)
A webhook is a URL that one application calls when an event occurs. Google Forms cannot send responses on its own, so a small script does it.
- Create a new scenario and add Webhooks, Custom webhook as the first module. It must be first, otherwise Make runs the scenario on a schedule instead of instantly. In our test we copied a scheduled scenario and added a webhook to it. The trigger type stayed “At regular intervals”, so the scenario did not run instantly. In a new scenario where the webhook was the first module, Make set “Immediately as data arrives”.
- Create the webhook and copy its address. It works like a password: anyone who knows it can send data into your scenario. Do not publish it or show it in screenshots.
- In the form, open the three-dot menu, then Apps Script. In the editor, first select all the code (Ctrl+A) and only then paste the script below. If you paste over the default myFunction template, our functions end up inside it: the function list shows only myFunction and Run does nothing.
- Replace the address in the first line with yours and save.
- Choose the setupTrigger function and click Run. Google asks for permissions; approve them.
const WEBHOOK_URL = 'PASTE_YOUR_MAKE_WEBHOOK_URL_HERE';

function setupTrigger() {
  const form = FormApp.getActiveForm();
  // Remove old copies so the trigger is not created twice.
  ScriptApp.getProjectTriggers()
    .filter(function (t) { return t.getHandlerFunction() === 'onFormSubmit'; })
    .forEach(function (t) { ScriptApp.deleteTrigger(t); });
  ScriptApp.newTrigger('onFormSubmit').forForm(form).onFormSubmit().create();
}

function onFormSubmit(e) {
  const payload = {
    responseId: e.response.getId(),
    submittedAt: e.response.getTimestamp().toISOString()
  };
  e.response.getItemResponses().forEach(function (item) {
    payload[item.getItem().getTitle()] = item.getResponse();
  });

  const response = UrlFetchApp.fetch(WEBHOOK_URL, {
    method: 'post',
    contentType: 'application/json',
    payload: JSON.stringify(payload),
    muteHttpExceptions: true
  });

  const status = response.getResponseCode();
  if (status < 200 || status >= 300) {
    throw new Error('Make webhook rejected the request: HTTP ' + status + ': ' + response.getContentText());
  }
}
The last lines of the script check Make’s response. If the webhook queue is full or there are too many requests, Make replies with an error (HTTP 400 or 429 according to the documentation). Without the check the script would finish as if all were well while the inquiry never reached the sheet. With it, the run is marked as failed in Executions, so the problem is visible.
The check only catches Make refusing the request: a “200 Accepted” response means the request entered the webhook queue, not that every scenario module completed. Look for errors that happen during processing in Make’s execution history.
setupTrigger creates what Google calls an installable trigger: “From form, On form submit”. Without it the function name onFormSubmit on its own starts nothing, and this is where it is easy to get stuck. You can confirm it on the Triggers page in Apps Script, which should list one trigger. The field names in the script match the question titles, so if you rename a question, change it in Make as well.
- Submit a test response. Make shows “6 values detected”: responseId, submittedAt, Name, Email, Phone, Comment. Now add the same modules as in steps 5 to 8 after the webhook: Search Rows, a Router with “New inquiry” and “Repeat inquiry” routes, and Add a Row plus Telegram on each route. Take values from the Webhook module: here the fields have plain names (Name, Email, Phone, Comment), without the duplicated entries you see in form responses. For Date use the same formatDate function and the format DD.MM.YYYY HH:mm on the submittedAt variable. The script sends the submission time as an ISO string in UTC, and formatDate converts it to your account’s time zone: in our test a 22:45 local submission appeared as 22:45 in Leads.
- Save the scenario and switch it to Active.
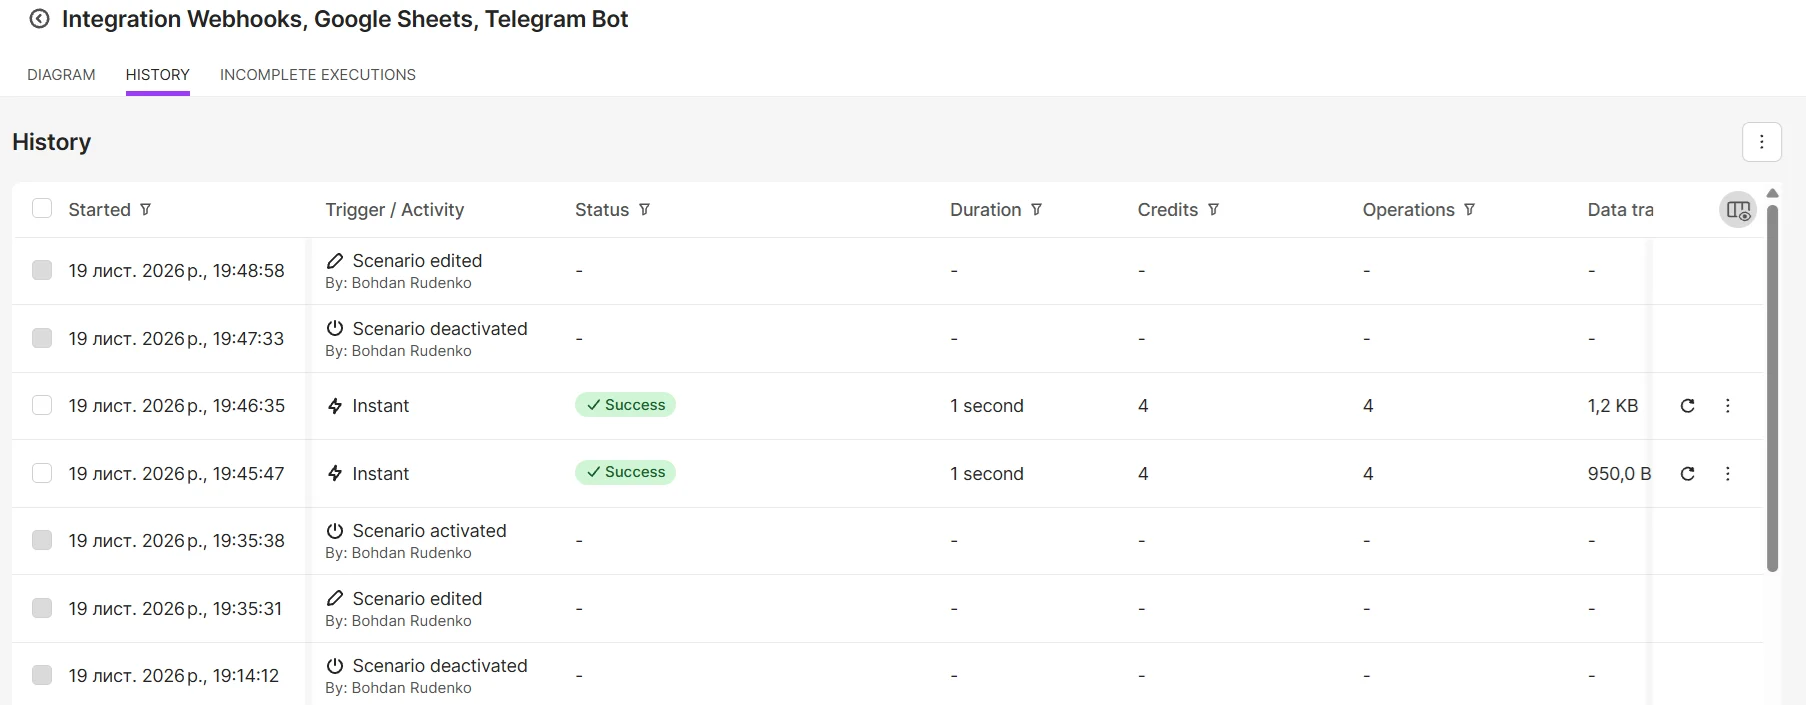
In our test the Method B scenario with the same repeat lookup behaved exactly like Method A: the first Hotel Partners inquiry was marked “New”, a second one from the same address a minute later was marked “Repeat”, and Telegram received “New inquiry” and “Repeat inquiry”. Each run cost 4 credits. So for single inquiries the processing cost is the same in both methods (4 credits), and the main difference is the idle checks, which Method B does not have. If several inquiries arrive between two checks, Method A comes out cheaper, because the read credit is paid once per run (two inquiries cost 7 credits against 8 in Method B).
If you tested Method A earlier, switch that scenario off before you start Method B: otherwise it keeps spending credits on its schedule and takes one of the two active-scenario slots on Make Free.
Check: History shows a run with the Instant trigger, and in Apps Script Executions the onFormSubmit run has the status Completed.
Step 10. Submit a new inquiry and repeat submissions
Phase D. Testing
Open the form and submit an inquiry from a new address, then another from the same address with a different phone format, and then a third from the same address. After a minute (Method B) or at the next run (Method A), check the sheet and Telegram.
In our test, a submission for Bravo Studio using [email protected] and the phone number “+380 67 555 66 77” produced a “New” row. The second inquiry from the same address with the phone “380675556677” got “Repeat”, because the search runs on email, not on phone: different formats of the same number made no difference. That is convenient, with a downside: if the person uses a different address, we will not know it is the same person. The third inquiry checks the Limit in Search Rows: it should produce exactly one Repeat row.
Check: Leads has three rows (New, Repeat, Repeat) and Telegram shows three messages.
Where it is easiest to go wrong
Everything below was reproduced in our test or taken from documentation; the source is named where it matters.
- A 15-minute schedule around the clock eats the limit. By our calculation that is about 2,880 credits a month against a limit of 1,000, even with no inquiries. Narrow the schedule or move to Method B.
- A repeat inquiry creates duplicate rows. If Search Rows has no Limit of 1, the Repeat branch runs once for every matching row.
- An inquiry without an email is not marked as a repeat. An empty email makes Search Rows return zero rows, so two inquiries without an email both get New. Make Email required.
- The first response was not processed. “Run this module only” on Watch Responses consumes the response. Submit another one to refresh the sample.
- The date in the sheet has quotes or an error. Enter the format without quotes and insert variables from the mapping panel.
- The phone turned into #ERROR!. Set Value input option to “Raw”.
- One module’s error stopped the scenario. In our Method B test Make switched the scenario off after the very first error. In that case the inquiry was not lost: it stayed unprocessed in the webhook queue, and when we activated the scenario again Make asked “Process old data” or “Delete old data”; we chose the first and the inquiry went through the whole chain. This is one observed case (an error that switched the scenario off), not a guarantee for every kind of failure.
- The form script does nothing. Check that the trigger exists (Triggers page) and that the code was pasted after Ctrl+A. Script errors, including Make refusing an inquiry, appear in Executions.
- The webhook queue. According to Make’s documentation (help.make.com, 19 November 2026) every webhook has a queue of 667 items for every 10,000 plan credits, up to 10,000. For the 1,000 credits of Make Free that works out, by our calculation, to a queue capacity of about 67 pending inquiries at a time. This is not a monthly limit: items are removed from the queue once the scenario processes them. When the queue overflows, the sender gets HTTP 400 “Queue is full”, which is exactly the case the check in the script catches. A webhook not attached to any scenario for more than 5 days is deactivated automatically.
- A bot token or webhook address in a screenshot. These are passwords. Hide them before publishing any screenshot.
What to do next
You now have Google Forms responses going to Telegram and a sheet that accumulates them. The next step depends on what you need. If you want owners and statuses, move to a mini-CRM in Google Sheets. If you are ready for a full CRM, see how to set up your first pipeline in HubSpot.
Related resources
- CRM selection guide
- Make review
- A mini-CRM in Google Sheets
- How to set up your first CRM pipeline in HubSpot
Ready-made scenarios
-
Method A: on a schedule Make → Create scenario → Import Blueprint; then connect your own accountsDownload .json
-
Method B: instant, via webhook Make → Create scenario → Import Blueprint; then connect your own accountsDownload .json
Affiliate link Create a Make account